You don’t need a backyard to grow your own food. Growing food in buckets works almost anywhere. You just need a bucket, a drill, and about twenty minutes.
Maybe you live in an apartment. Maybe your yard is all concrete. Maybe you tried gardening once, killed every plant, and gave up. None of that has to stop you.
Plenty of people grow food this way right now. In one 2025 survey, 71% of Americans said they planned to grow a food garden that year. People who gardened in 2024 said they saved about $875 on groceries. More than half grow food just to spend less at the store.
Buckets are where a lot of beginners start. They’re cheap. They’re simple. And they’re hard to mess up once you know the rules.
This guide walks you through how to grow food in buckets from start to finish. You’ll learn how to pick safe buckets, drill them for drainage, mix the right soil, choose easy crops, and water and feed them so they actually grow. Let’s get your first bucket going.
Why Bucket Gardening Beats a Big Backyard
A backyard sounds nice. But you don’t need one. For a lot of people, buckets are actually the better choice. Here’s why.
Buckets are cheap or even free. Many bakeries, restaurants, and delis throw out 5 gallon buckets every week. Ask, and you might get a stack for nothing. A hardware store bucket costs a few dollars.
You can move them. Plants need sun. With buckets, you can chase it. Slide them across your patio as the day changes, or pull them under cover when a storm rolls in. A garden bed can’t do that.
You control the soil. Bad dirt is the reason many gardens fail. With a bucket, you skip your yard’s soil completely and use a clean mix made for plants. No weeds. No mystery chemicals from the ground.
You waste less water. You water each bucket on its own, right at the plant. That beats soaking a whole bed and losing most of it.
Small spaces still grow real food. The average home food garden in the U.S. produces about $600 worth of produce a year. Your buckets won’t match a full plot, but a few of them can still cut your grocery bill and put fresh food on your table.
One more thing worth knowing. Renters now buy more vegetable seed than homeowners do. That tells you something. Small space growing isn’t a backup plan. For millions of people, it’s the main way they garden.
What You Need to Start (Keep It Simple)
You don’t need much. Here’s the short list.
Must have:
- A 5 gallon bucket that is food safe
- A drill with a ½ inch bit
- Potting mix (not soil from your yard)
- Seeds or young plants
- Water
Nice to have:
- Mulch, like straw or shredded leaves
- Fertilizer (liquid or slow feed)
- A stake or small trellis for tall plants
Two of these matter more than the rest. Get them right and you’re most of the way there.
First, the bucket. Use a food safe one. Look on the bottom for the recycling symbol with a “2” and the letters HDPE. That kind is made for food and is safe for growing. Never use a bucket that held paint, pesticides, or other chemicals. Those can leak into your food.
A quick note on color. Dark buckets soak up heat. That helps in cool weather but can cook roots in a hot climate. Light buckets stay cooler. Pick based on where you live.
Second, the soil. We’ll cover that in its own step, because it trips up more beginners than anything else.
Step 1: Prep Your Bucket So Roots Don’t Drown
This is the most important step in the whole guide. Do not skip it.
Here’s why it matters so much. Bad watering is the number one reason container gardens die, according to the University of Maryland Extension. Most of the time, the real problem isn’t the watering. It’s that water has nowhere to go. The roots sit in a puddle and rot.
Drainage holes fix this. But most beginners drill them wrong.
They drill holes only in the bottom. Then they set the bucket flat on concrete. The bottom seals against the ground, the holes get blocked, and water gets trapped anyway.
Do this instead:
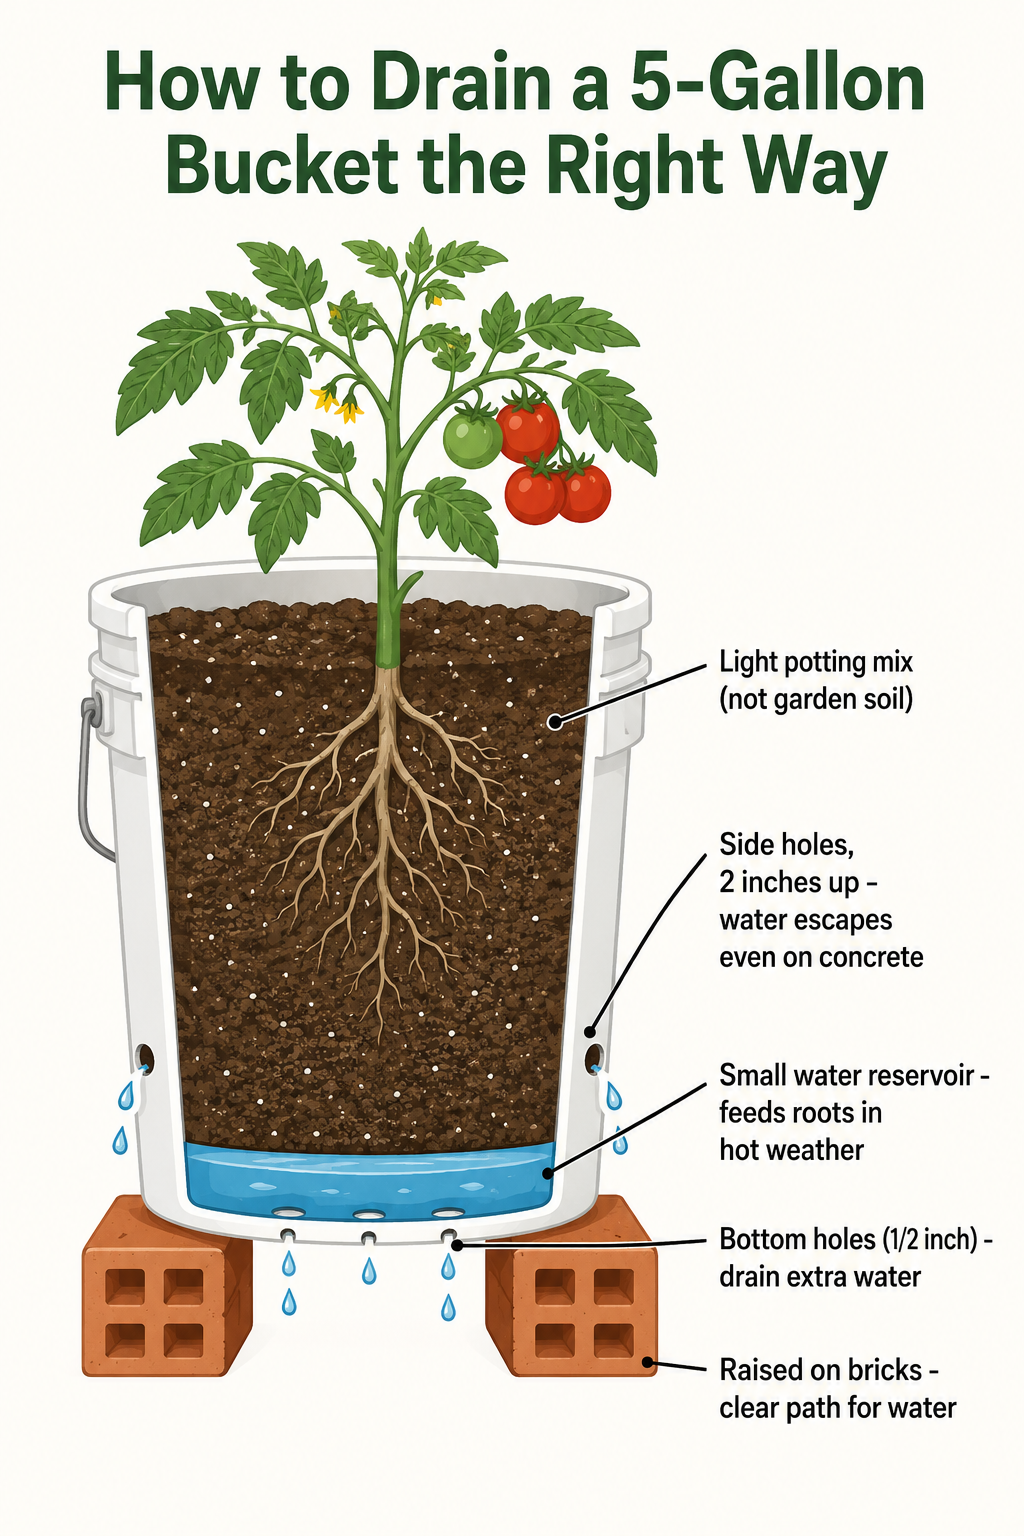
- Drill four or five holes in the bottom of the bucket. Use the ½ inch bit.
- Now drill another four to six holes around the sides, about 2 inches up from the bottom. This is the part people miss. Side holes let water escape even when the bucket sits flat.
- Raise the bucket off the ground. Set it on a couple of bricks or some wood slats. This gives water a clear path out.
Common mistake: Holes in the bottom only, with the bucket flat on the ground. Water can’t drain, and your plant slowly drowns.
With drainage handled, you’re ready to fill the bucket. And the soil is the next place people go wrong.
Subtitle for This Block
Title for This Block
Text for This Block

Step 2: Fill It With the Right Soil (Skip the Yard Dirt)
Don’t grab a shovel and dig up your yard. Garden soil is the wrong choice for a bucket.
Here’s the problem. Garden soil is heavy. The University of New Hampshire Extension puts it plainly: garden soil is too heavy for containers. In a bucket, it packs down into a hard block. Roots can’t breathe. Water can’t move. Your plant struggles from day one.
You want a light, fluffy potting mix instead. A good mix has three jobs: hold water, let extra water drain, and feed the plant. Look for a mix that has these parts:
- Peat moss or coco coir for the base
- Perlite or vermiculite to keep it light and help it drain
- Compost for nutrients and to hold some moisture
You can buy a bag of quality potting mix and add a little compost. That’s the easy route. The University of Maine Extension says a mix of potting soil, compost, peat, and vermiculite works well.
Fill the bucket to about 1 inch below the rim. Wet the mix before you plant. It should feel damp, like a wrung out sponge, not soggy.
Pro tip: Tomatoes, peppers, and eggplant are in the nightshade family. Give them fresh mix each year. Old mix can carry pests and disease that hit these plants hard.
Your bucket is ready. Now for the fun part. Picking what to grow.
Step 3: Pick Vegetables That Love Buckets
Not every plant fits a bucket. Corn, for example, gets too big and gives too little. But a surprising number of vegetables grow great in buckets.
Start with the rule of capacity. A single 5 gallon bucket holds either one large plant or several small ones. So you plant one tomato, or about six herb plants. Not both.
The Oregon State University Extension lists these as strong picks for containers:
- Lettuce
- Herbs (basil, parsley, cilantro, mint)
- Tomatoes
- Peppers
- Eggplant
- Carrots
- Beans
- Squash
- Radishes
- Kale
- Chard
- Spinach
When you shop, look for words like dwarf, bush, or patio on the label. These types stay smaller and fit a bucket’s root space. A few examples: ‘Thumbelina’ carrots, dwarf eggplant, and bush beans instead of pole beans.
Want a flagship crop to start with? Grow a tomato. About 86% of home gardeners grow tomatoes, and for good reason. One plant in one bucket can feed you for weeks. Just pick a bush or patio type so it doesn’t grow into a monster.
You can also grow potatoes in buckets if you add extra holes up the sides. Everbearing strawberries do well too, and they give you fruit twice in a season.
What vegetables grow in 5 gallon buckets best for a first try? Tomatoes, peppers, and a bucket of mixed herbs. They’re forgiving, they produce a lot, and they’re easy to harvest.
Picked your crop? Let’s get it planted.
Step 4: Plant Your Crops the Right Way
You can start from seeds or from young plants. For your first bucket, buy young plants. They’re faster and more forgiving than seeds, so you see results sooner and quit less.
Here’s how to plant:
- Scoop a hole in the center of your wet mix, big enough for the root ball.
- Set the plant in and press the mix gently around it.
- Keep the plant about 1 inch away from the bucket’s edge. The University of Maine Extension recommends this so roots don’t overheat against the hot plastic side.
- Water it right after planting.
Add support now, not later. If you’re growing a tomato or cucumber, push a stake or small cage into the bucket the day you plant. Wait until the plant is heavy and you’ll snap stems trying to add it.
Then think about sun. Most vegetables need 6 to 8 hours of direct sun a day to produce well. Morning sun is a great start. Put your bucket where it gets that, and move it if a spot turns out too shady.
Planted and staked? Good. The next part decides whether all of this works. Water.
Step 5: Water and Feed So Plants Actually Produce
Watering sounds simple. It isn’t, and getting it wrong is the top reason buckets fail. Here’s the rule that fixes most problems.
Water deep, not often. When you water, keep going until water runs out the drainage holes. The University of Maryland Extension says one long soak beats several quick sprinkles. A light splash only wets the top inch and leaves the roots dry.
Buckets dry out faster than the ground. In hot weather, check the soil every day. Stick a finger in. If the top inch or two feels dry, water.
Watch for one sneaky problem. If a bucket goes too long without water, the soil shrinks and pulls away from the sides. Now water runs straight down the gap and out the bottom, leaving the middle bone dry. If you see that gap, water slowly, or set the whole bucket in a tub of water for a bit so it soaks up from below.
Now feeding. Potting mix runs out of food after a few weeks. Your plants will turn pale and stop producing if you don’t feed them. Two easy options:
- Feed every 10 to 14 days with a liquid plant food or compost tea.
- Or mix a slow feed fertilizer into the soil when you plant, so it releases over time.
Optional upgrade: the self watering bucket. If daily watering sounds like a chore, build a self watering setup. It uses two buckets stacked together. The bottom one holds a water tank. Water wicks up into the soil on its own through the roots, no pump needed. This trick has been around for years and is well documented by the University of Maryland Extension and others. It cuts your watering down to filling a tank every few days.
Keep this rhythm going, and your plants will pay you back. Before long, you’ll be picking food. Which brings us to the best part.
Step 6: Harvest, Then Keep It Going
This is what it was all for. Fresh food, grown by you, in a bucket.
Harvest often. With many crops, the more you pick, the more they make. Beans and peppers keep producing when you keep picking them. Pull lettuce leaves from the outside and the plant keeps growing. Don’t let food sit and overripen on the plant.
When a season ends, don’t toss your soil. Dump it out, mix in fresh compost and a little perlite, and you can reuse it next year. The one exception is nightshades. Give tomatoes, peppers, and eggplant fresh mix each time to avoid disease.
Before you go, here are the mistakes that sink most bucket gardens. Avoid these four and you’re ahead of most beginners:
- Drilling holes only in the bottom. Add side holes and raise the bucket.
- Using yard soil. It packs down and chokes roots. Use light potting mix.
- Forgetting to feed. Mix runs out of food. Feed every week or two.
- Letting buckets dry out. They dry fast. Check them daily in the heat.
Start With One Bucket This Week
Let’s bring it all together. You pick a food safe bucket. You drill holes in the bottom and sides, then raise it off the ground. You fill it with light potting mix, not yard dirt. You plant one easy crop, give it sun, water deep, and feed it every couple of weeks. Then you harvest.
That’s the whole thing. It’s cheap, it’s simple, and it’s low risk. If your first plant struggles, you’re out a few dollars and a little time, not a whole garden.
So don’t overthink it. Don’t wait for the perfect setup. Grab one bucket and one tomato plant, and start this week.
Now that you know how to grow food in buckets, the only thing left to do is drill that first hole.

Transform Your Business Today
Bucket Garden Planner
Pick what you want to grow and tap the plus button for each plant. The planner shows how many buckets to buy, how much potting mix you need, and how much sunny space it takes.
Buckets needed
0
Potting mix
0 L
Sunny space
0 sq ft
How to use this planner
- Find a crop you want to grow in the list.
- Tap the plus button once for each plant you want. Tap minus to go down.
- Watch the three boxes update on their own.
What the numbers mean:
- Buckets needed: how many 5 gallon buckets to get. One big plant fills one bucket. Small crops like herbs or lettuce share a bucket.
- Potting mix: about how much soil to buy in total, plus how many bags that is.
- Sunny space: the floor space your buckets will take, at about one square foot each.
These are starting estimates, not exact rules. Your real numbers shift a little with the plant variety and your weather.